

Most organisations, at some point in their lifecycle, will be a victim of a cyber-attack or hack. We all know it is a question of ‘when’ not ‘if’. When an organisation realises it has fallen victim to an adversary, an incident response (IR) team is often one of the first teams drafted in to assist in the mitigation and recovery of an attack.
In the early stages of an ongoing incident, after an organisation has identified an issue, a cyber security incident response team (CSIRT) will know very little about the task at hand and they will need to quickly establish the scope of an investigation. Initially an investigation’s scope can start of small. It can be a customer database server which has suffered an SQL attack, or a single employee’s workstation that has been infected with malware because of clicking a link in a malicious email. However, the scope can quickly scale as more information becomes known to the investigators.
An ideal solution to investigating an incident would be to allow the CSIRT to capture a full disk image copy of all affected machines, allowing investigators to have access to as much information as possible. This will help identify indicators of compromise and root cause. The issue of dealing with full disk images is dealing with the amount of data. It is impractical, costly and will cause further organisation interruption by turning off and disconnecting. There is also a guarantee in the loss of volatile data such as memory and cache, which often contains crucial evidence associated with common hacking techniques.
Windows PowerShell has a large pre-existing capability to collect key artifacts of information that would assist an investigator in understanding what is happening on a machine in real time. Artifacts such as running processes, network connections, logged on users, system information can all be extracted using PowerShell commands. There is a tool that automates the collection of these artifacts of information.
Kansa PowerShell
Kansa PowerShell is a modular incident response framework that has the capability to operate in a one-to-many style across endpoints in an enterprise. Kansa can be deployed in scenarios such as incident response, breach hunts, or for building an environmental baseline. The simplicity of the framework allows a CSIRT to collect data quickly and at scale, speeding up the remediation and recovery of a breach.
Kansa takes advantage of Windows Remote Management and PowerShell remoting to collect data from across an enterprise domain. Kansa is also safe to deploy across multiple endpoints as it uses PowerShell’s default non-delegated Kerberos network logons, not the vulnerable CredSSP and therefore does not expose credentials to threats of harvesting.
The framework contains many stand-alone PowerShell ‘.ps1’ modules that can collect a vast amount of useful data needed during an initial triage of an incident.
All the modules can be run individually from their respective folders and the output viewed in PowerShell. Not all modules in Kansa are run by default. The modules set to run can be seen in the ‘modules.conf’ file. If a module is commented (#) out it will not run, simply uncomment to allow Kansa to run that module.
Installing Kansa
Note: The installation and execution of Kansa PowerShell requires an administrative PowerShell session.
The simplest way to install Kansa on a target workstation is to download the .zip from the Kansa GitHub Repo.
Once the file is downloaded, extract the .zip file:
PS > Expand-Archive ‘.\Kansa-master.zip’
Kansa is designed to be run at scale across hundreds of hosts attached to an Active Directory domain. As by default Kansa runs on hosts with an associated Domain Controller, it should run out of the box. Windows Remote Management and Remote Service Administration Tools are required to be enabled for Kansa to be executed. To enable the requires tools to be use the following command:
PS > enable-psremoting
Next, navigate to the Kansa-master directory and allow the ‘.ps1’ files and modules to be executed:
PS > ls -r *.ps1 | Unblock-File
PS > Set-ExecutionPolicy Unrestricted
if Kansa is required to be executed on a single host, or a host not connected to an Active Directory Domain, there is an additional step that needs to be completed.
The network profile of the host will need to be altered from ‘public’ to ‘private’. This stops Kansa from looking for more hosts to collect data from, reducing the probability of failures.
To view the hosts current network profile in PowerShell you can use the following command:
PS > Get-NetConnectionProfile
To change the connection profile, you edit the correct interface profile with this command:
PS > Set-NetConnectionProfile -InterfaceIndex [0] -NetworkCategory Private
Ensure the InterfaceIndex number is altered to match that of the hosts InterfaceIndex.
Running Kansa
After the host environment is correctly configured, Kansa can now be executed using a simple, one line command.
As Kansa will use Active Directory Kerberos to authenticate, which is does by default, there is no need to instruct the script to do any differently. The main difference is in the command below, a target list has been provided. This is a text file with a single hostname on a new line. This is where Kansa can be deployed to hundreds of hosts across a at once.
PS > .\kansa.ps1 -TargetList hostlist.txt -ModulePath .\Modules -Verbose
As with the setup, running Kansa on a single host, or a host not connected to an Active Directory domain requires a slightly different command argument.
To get it to run on a localhost, that host needs to be specified as a target. Without a target, Kansa will look to run on an entire AD. As Kansa relies on the AD Kerberos to authenticate, when running on a localhost there is no Kerberos, so Kansa needs to be told to run NTLM authentication, with the username passed as an argument.
PS > .\kansa.ps1 -pushbin -target localhost -credential username -authentication negotiate
The successful completion of Kansa execution will generate a .zip folder titled ‘Output_[timestamp]’, which will contain the results of the PowerShell modules in .csv format organised in named folders, and an Error.log with details of modules that had error or failed during execution.
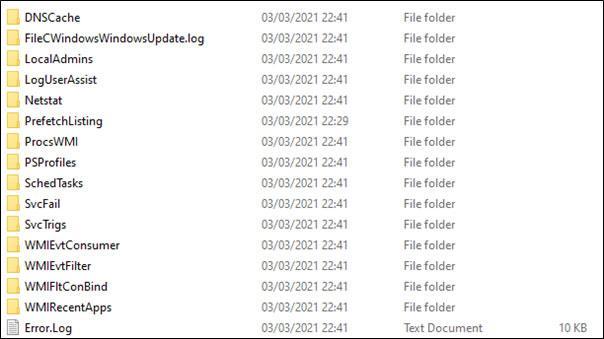
The CSIRT will now have a large amount of data they can use to be able to quickly determine the next steps they should take in the investigation.
This blog will be part of a series of upcoming posts assisting incident responders in leveraging PowerShell tools and scripts to assist with triage and investigations.
If you or your business are struggling with automated responses to security events, or perhaps you find the day-to-day demands of operating a SOC are hindering your ability to develop a more streamlined and effective solution, then we will be more than happy to help.
Give our team of experts a call today and we will be delighted to have a no obligation chat to you around your individual cyber security requirements. You can reach our team here.
Author
James John
Cyber Defense Team Leader
 Blogs
Blogs